Wednesday, December 5, 2012

Best smartphone volume booster

Crummy sounding iPod docks can cost a great amount of money, and good sounding docks can cost a Bundle. Why waste your money when you can boost your volume just fine with a paper cup or a cereal box? I came across a tip on pinterest and found that some of them worked remarkably well—specifically, sticking your phone in a paper cup. I came up with this idea one day when I was charging my phone and suddenly my music turn on, and the sound came out really loud and clear, it was like having speakers. It reminded me of the lotion bottle phone holder .

This isn't exactly the most scientific test in the world, just a simple experiment. However, the paper cup was not just the loudest, but also the best sounding. There are several other methods to boost the volume of your smartphone but this one really works for me. There are quite a few tricks to try and the best methods work when you least expect it to. Just use something you can put your phone in that boosts sound.

I think that this method is like temporary smartphone speakers. I like to use it when I'm in the shower,  in my room getting ready or cleaning around the house. Its a great way to keep me going, and I'm so glad that I don't have to purchase an expensive pair of speakers just for my phone.

You can use a glass cup or a phone cup. Just try to experiment and find out which method(s) work for you.

Tuesday, December 4, 2012

DIY scarf organizer

Hey everyone! Its that time of year again, scarf season! That said, it's crucial to take out all scarves out from hiding and display them nicely where they can be easily seen. Now, we can easily go to the store and spend a bunch of money on closet organizers but that would just be a waste when most of us have what we need in our own home.

Its easy to take the easy way out and buy the organizer but the easy way out some times are costly, and we don't want that, we want to save! So I came up with the idea to simply use a hanger. It sounds silly that scarves will be organized by just a hanger but my way works....atleast for me it does.

It can work for you too, its very easy!

Before I started hanging my scarves, they would be stashed away in my drawers where I couldn't see them nicely and most times I wouldn't even wear them because I couldn't see it clearly. With my own scarf organizer, its easy to see and takes up much less space and that's what we all need, more space!!

Now this is a basic DIY project because my left hand is still not in good shape to do really exciting, crafty projects. Thank you for your patience guys!

The project: Gather up scarves and all your hangers.

DIY:
STEP 1: Lay down scarves next to each other on a flat surface.
STEP 2: Choose 3-4 scarves to hang.
STEP 3: Hang scarf on to hanger and make a loop to make a knot then pull down.
STEP 4: Continue STEP 3 with each scarf.
STEP 5: Once your done, hang it in your closet and see how much new space you have!

I love mine!


Monday, December 3, 2012

Blog Break...

Hey everyone! So sorry for not posting new DIY projects lately. A week ago (night before thanksgiving) I had a bad accident where a part of my left hand got burned and I couldnt use my left hand at all. It is a second degree burn and for 5 days I couldn't even move my hand. That is why I haven't been able to create cool new projects to share with you guys.

These past few days I've been able to move my fingers and stretch my hand a bit by where the burn is, which is good because that means its healing. I will have a new DIY post up soon! Its not going to be anything too crafty because I'm barely able to do anything involving both hands, since I don't want to get infected so I have to be careful. Thank you for your understanding!


Wednesday, November 28, 2012

2nd audio podcast

Hey guys, I have created a second audio podcast for you to keep up with my latest most popular trends. I kind of touched up on one project that has been a hit, its been so popular and recognized in public especially. People have definitely been impressed. So check it out and hope its to your liking. Like I said before, may you all find inspiration in this post and hope it motivates everyone to start DIYing. Thanks!

Wednesday, November 14, 2012

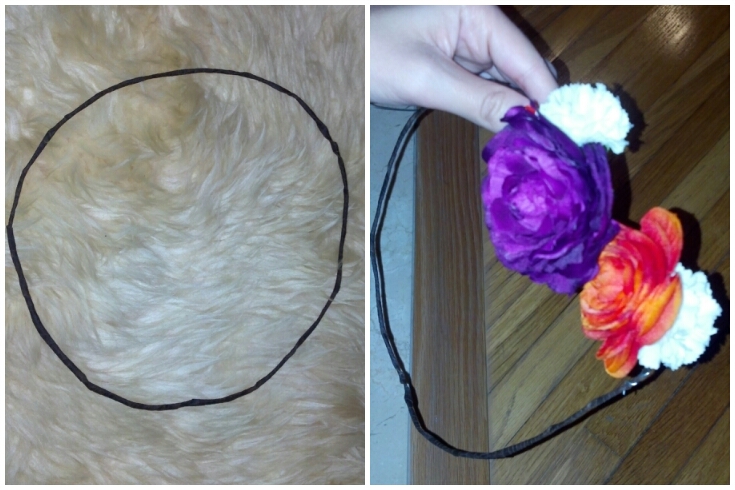
DIY Floral headpieces

Hey everyone, Just wanted to share another weekly inspiration to you all. This weeks inspiration comes from a friend of mine. She introduced my to the Lana Del Rey headpiece. You can go on Pinterest and search Lana Del Rey she is a model and has been fashioning these beautiful, floral head pieces.

So I decided to check it out myself and fell in love. A couple of my girlfriends and I got together the other night and raided the garage for the old glue gun and any fake flowers we could find. Gathering the material was a success because I wasn't about to spend over $40 bucks on everything. Everything adds up and turns out to be very costly. Its scary how that happens.

After gathering up all of the material, figure out a pattern for your flowers, an order in which its going to sit on the crown. This was my first time making this headpiece  and when if you decide to do this project also, remember that we are not experts and its ok if it doesn't look like the one online. Atleast it was worth the try right?

Project: Gather your materials, wire, felt, fake flowers, and a glue gun....masking tape is optional.

DIY:
STEP 1: Take the wiring and measure your head with it.
STEP 2: After measuring, cut off the wire where it ends on your head.
STEP 3: Use dark colored masking tape to coat the wiring so the wire doesn't show.
STEP 4: Glue flowers one by one, next to eachother along the wiring.
STEP 5: Cut thing strips of felt and glue it in the inside lining of the crown (this is so that it sits comfortably on your head and doesn't poke you).

When finished and happy with result, ROCK YOUR NEW FLORAL LANA DEL REY HEADPIECE!


Thursday, November 8, 2012

Putting down the hot tools

Today I want to share my inspiration with you all. I just discovered a quick and easy way to style and tame my natural, curly hair! Most of the time I straighten my hair which leaves my hair dry and ends dead. Well, I wasn't surprised to learn that straightening my hair a lot is the reason why my hair doesn't grow longer.

I want longer and healthier hair, so putting down the hair straightener is what I'm going to do. Anyways, I found a cool new way to style my hair. After trying it out I began loving the way my curly hair was staying; very natural and tamed, and not too poofy.

So I came across a Pinterest post that demonstrated a "how-to" on natural curls and simple steps and natural, beautiful curls are achieved....without spending hours using the curling iron to get a similar result.

The Project: With leave in conditioner, gel spray and a t-shirt, tamed-natural curls will be acheived.


DIY:

STEP 1: brush hair when damp, then apply the leave in conditioner only an inch below the root of the hair all the way to the end.
STEP 2: apply the spray gell all around, make that once again it doesnt reach the root of hair.
STEP 3: Scrunch hair with a T-shirt, not a towel.
STEP 4: Pin back any part of your hair that you would like, like a side pin.
STEP 5: After scrunching, it is up to you to apply more spray gel. When happy with result, ROCK THOSE CURLS

You just saved time from spending on using a curling iron, with a few simple steps it was easy to achieve beautiful and natural curls.

TIP: I would also like to add that I did not have leave in conditioner so I used regular conditioner that still worked perfectly fine on me :) Hope you will find that this works for you too.


Thursday, November 1, 2012

Video blog

Hello everyone, Today I am posting a video that I have created where I actually demonstrate one of my favorite DIY projects. I really wanted everyone to see the process of how I create my pennyless projects. There are several DIY projects that I have posted about with pictures but this is a video version that will actually teach you all how I do it.

I hope that this video will be just as educational and inspirational to those that are also passionate about DIY projects. May you all find it simple and easy, and do-able to fit into your busy lifestyle. There is not enough time in the day but sometimes we surprise ourselves when we actually try something.


I am no expert at DIY projects, I'm a beginner. Just want everyone to remember to have fun along the way and know its ok to mess up :)

Wednesday, October 24, 2012

Simple Fall Scarf

Hi everyone! As the season has slowly been changing, so has the weather. Its definitely getting colder and windier here in Southern California. I think that this is the best time to introduce my do it yourself fall scarf! What I'm talking about is not creating a big, long and knitted scarf that hangs heavily around your neck, but it's going to be shorter, lighter and cuter :) Its basically going to dress up the top you're wearing and your friends will love it!

So I have been inspired by these quick and easy DIY scarves that I see on pinterest. I always repin my favorite ones and havent yet made one myself. Today will be that day! This project is going to be very quick and easy and your going to make one too! 

Although its colder out now, the weather is always changing here in Southern California. That means we don't always want a scarf that makes us too hott. I remember over the summer my mom bought a scarf that was similar to the one im going to make and it cost her $17. I think that it was too expensive for a scarf of that size and lacked detail.

With this project, you will not only create a cute accessory to your outfit, but your friends will admire your new scarf and you are going to save $$$ which is always a good thing!

The Project: Find a T-shirt that you don't mind cutting up and a pair of hefty scissors! That is all your need. Your scarf will be ready in no time!

DIY: 
STEP 1: Lay down on a flat surface
STEP 2: Cut off the part that separate
 STEP 3: Cut straight strands until the middle 
STEP 4: Make sure to turn it over and repeat STEP 3
 STEP 5: After making sure everything looks right, try it on and ROCK YOUR NEW SCARF!


Wednesday, October 17, 2012

Inspired nails with friends

Hi everyone, I want to introduce another nail polish project to you all because I just love doing my nails! I consider it a mini hobby or just something I enjoy doing overall. Well, every time I go into Walgreens I see the dollar bin of polish and think "wow these colors are so amazing and vibrant, don't mind if I grab a few!."

I like the brand Sinful Colors because they have almost every shade in vibrant and attracting colors that I can't NOT buy. Because also they are the most inexpensive brand you can find on the market.

So one of my close friends is also a nail polish freak like me and asked if I could do one of my projects on her fingers and of course it cheered me up because, how could I refuse? Not only did she provide the colors of her choice, but she was very pleased with the result and saved money $$. A color change at the salon with design is around $20 including tip; if that.

If you are going to try this at home, its a bit of a process but you will find that its a speedy process once you get the hang of it!

The Project: Choose two polishes and get a sponge to dab the colors with (or one of those white make up sponges that come in a bag), some top coat and also nail polish remover.

DIY:
STEP 1: pour one drop of nail polish the size of a dime, of each color on top of each other on a sheet of paper (or paint it onto the sponge)
STEP 2: Dab the sponge lightly into the colors you chose
STEP 3: After dabbing the colors, press the sponge gently on each nail(s)
STEP 4: Take a Q-tip and dip it in the nail polish remover and carefully remove the excess polish along the sides
STEP 5: After removing all the excess polish, apply top coat, wait to dry and ROCK YOUR COOL NAILS!


https://mail-attachment.googleusercontent.com/attachment/u/0/?ui=2&ik=ff1e8564b4&view=att&th=13a726115fa5d3df&attid=0.1&disp=inline&realattid=1416142458512192297-1&safe=1&zw&saduie=AG9B_P-Y_5MlLLJWd8Pqmg8CG0Q1&sadet=1350541253743&sads=Mej_z25o6mL6IAj0lWT57IjQBwY

https://mail-attachment.googleusercontent.com/attachment/u/0/?ui=2&ik=ff1e8564b4&view=att&th=13a726146c60cd13&attid=0.1&disp=inline&realattid=1416142472890522953-1&safe=1&zw&saduie=AG9B_P-Y_5MlLLJWd8Pqmg8CG0Q1&sadet=1350541363879&sads=KRoxvgfWUoSPr8kHCVcEAYXPBBY

https://mail-attachment.googleusercontent.com/attachment/u/0/?ui=2&ik=ff1e8564b4&view=att&th=13a726170aca5730&attid=0.1&disp=inline&realattid=1416142481798587072-1&safe=1&zw&saduie=AG9B_P-Y_5MlLLJWd8Pqmg8CG0Q1&sadet=1350541391668&sads=zLT02H9gf9Ydk3L3IOOoYqYcwYc
 https://mail-attachment.googleusercontent.com/attachment/u/0/?ui=2&ik=ff1e8564b4&view=att&th=13a7262508f0d643&attid=0.1&disp=inline&realattid=1416142496556593565-1&safe=1&zw&saduie=AG9B_P-Y_5MlLLJWd8Pqmg8CG0Q1&sadet=1350541426168&sads=wvV8clwK4-kcWXMlu1IYVbv1_uE


Wednesday, October 10, 2012

My podcast

                        Hi Everyone, I have created a podcast for you all. I hope you enjoy it :)

Wednesday, October 3, 2012

BORING SWEAT PANTS TO NEW GYM SHORTS

Hi everyone! I hope most of you are getting a hang of these projects, they are made to be quick, simple and fun. Yesterday I had a doctors appointment and was told that I need to incorporate exercise in my daily routine. Its been a while since I've stepped foot in the gym (about 7 months -__-).

SO, I've been thinking about going back soon. The only thing is that I need new gym clothes. Because going back to the gym is like going back to school or work, you need to look fresh! But I don't have extra money to spend on new shorts... It would probably cost around $12-$20 depending on where I shop. Not wanting to run to the store, my initial reaction was to run into my room and raid my dresser.

I have a drawer full of sweat pants that I barely wear and don't even care about much anymore. I chose a pair that I did not mind cutting up. Its time for you to find an old pair of sweat pants that you want as a new pair of sweat shorts!! In a few easy steps you will have a new pair of gym shorts without spending a dime!

The project: Turning forgotten sweat pants into fun new gym shorts. All you will need is a fine pair of scissors!

DIY:
STEP 1: Lay sweat pants down on a flat surface
STEP 2: Take a pair of shorts you already have and lay it over pants to get a precise measurement
STEP 3: Cut through the desired area that is appropriate for you
STEP 4: Try it on to see if front, back and sides look even
STEP 5: When happy with result, ROCK YOUR NEW WORK OUT SHORTS!!!


Thursday, September 27, 2012

GLAMOROUS NAILS WITHOUT TIPPING THE MANICURIST!

Hi everyone! I hope you all have been able to DIY lately. These projects are made to be simple enough to get everyone trying. Well, today I felt like doing my nails, but wanted to change it up a bit. When it comes to doing nails, sometimes I get tired of the same tones of color. But we just have to use our creativity and change up the process!

What I'm about to show is a style that has been around for a while, but it should come to you as sort of a reminder that its still IN STYLE. I like this style because its subtle yet shows that your bold; and different.

In general, I like to do my own nails. Mainly because I am very particular in what I like and know what looks good on me. Since I am meticulous about detail, I save money from going to the nail salon. That is important to me, because Saving money is crucial as a student!

The Project: Choose a solid color nail polish, then choose another bold color; dark, bright, glittery, what ever you like. 

DIY:
STEP 1: Paint all nails the solid color
STEP 2: After letting nails dry, choose the bold color
STEP 3: Choose one finger on each hand and paint it with that bold color you chose (I chose both ring fingers)
STEP 4: Apply the top coat and let it dry
STEP 5: When you are satisfied with the result, ROCK THOSE BEAUTIFUL BOLD NAILS!

(TIP: accessorize with your nails with rings, bags, bracelets, etc. Also coordinate with your outfits, and remember that the colors don't necessarily need to match)


I like glitter :)

Saturday, September 22, 2012

MY DIY PHOTO SLIDE SHOW

Hi Everyone, I have created a short photo slide show to share with you all about my blog and projects I have worked on over the past few weeks. I hope you take the time to look through it and hopefully encourages you all to DIY :) Thank you! :)

Tuesday, September 18, 2012

DIY forgotton tanks to thoughtful skirts

Hi everyone! Today just like everyday, I open up my dresser drawers to figure out what to wear. Everytime, I find myself having to sort through the same pile of old tank tops that I dont wear anymore. Throwing them out or donating them has crossed my mind times before. but I realized that I just love the quality and fit of the tank. I just had to do something with these tanks that I see everyday but don't even wear everyday.

I decided to turn my tank, into a skirt! Not just with one tank, but this could be done with any tank that is stretchy enough to fit around my hips. I tried it out and it worked for me! So I hope it will work out for you too :)

Us girls love to shop and as a big shopper myself, spending extra money on a skirt that looks like one of my tank tops laying in my drawer, is not something I want to invest in; anymore. Forever 21 has similar skirts that I am about to demonstrate, for about $23. I like H&M because you can find a skirt like the one I am about to demonstrate, for less than $10. At other bargain stores, they are about $12-$17; and they are not even good quality.

What I am about to demonstrate to you all, is a tank top that I chose to wear as a skirt. I paired it up with a solid color top and styled it up with a long, cute necklace; that fits my style. Now its your turn to go find a tank that you would wear around those hips!

DIY
STEP 1:Wear the tank top as you normally would
STEP 2: Slowly pull tank down towards hips, like a skirt
STEP 3: Tuck in shoulder straps inside 
STEP 4: After making sure straps are tucked away and the skirt fits fine, find a top to wear it with
STEP 5: If you are pleased with the result, ROCK THAT NEW SKIRT HUNNY!


(TIP:  dress it up with accessories (necklace, bracelets, earrings, sandals, etc) 

Wednesday, September 12, 2012

DIY: From oversized unflattering shirt to hot new tank

Hi everyone! Feeling a little lazy right now, but I don't mind creating a new top to wear. Remember those over sized shirts that is taking up space in your closet or dresser? I want you to go find a few you don't mind tearing apart. Over sized shirts are a thing of the past now! Afterall, less is more, right?

I used to wear them to exercise, clean the house or sleep. But I need more tank-like tops to wear around too. What I'm about to demonstrate is making a tank that most of you are paying about $15-$20 for. But now you will get to save up a little more pocket money!

Project: creating a cute and simple tank in a quick and easy way. There are many possible styles to do so use your creativity create something that fits your style, if you'd like. This project does NOT require needles or thread, just a hefty pair of scissors that can cut through fabric.

If you found your desired shirt, lets get started!

DIY:
STEP 1. Lay shirt flat on a surface (bed, table, chair, anything flat)
STEP 2. Cut off both sleeves on each side and collar (neck part)
STEP 3. Try shirt on to see how you can make cuts more even
STEP 4. Take shirt and lay it flat again so that you are facing the back, pinch in half and cut out a shape (I chose a heart)
STEP 5. After perfecting each cut and way it fits, its time to Rock your new tank!

(TIP: you can also layer: try a tight fitted solid color tank or bandeau underneath new tank)


DIY bracelets!

Hi Everyone! Im excited to introduce my first DIY project with you. Just so you all know, we're NOT all crafty experts. I certainly am not. So I will not choose difficult projects; they will be fairly easy and simple. As I mentioned before, these projects are going to be recreating something fabulous out of what you already have. Its like bringing a broken down car back to life, and then sprucing it up with your personality :)

The project: Find a pair of hoop earring's big enough to fit your wrist, (that you don't wear anymore). If its just lying around your room or on your dresser collected in dust, or getting rusty then you're over them and need to make use of it. After finding a pair of hoop earings, find beads (charms), colored (animal print) fabric or just about anything you would wear as a bracelet.


DIY: 5 easy steps
STEP 1. Gather your desired material
STEP 2. Start applying it to earring
STEP 3. Make sure to use adhesive or something to make material stick
STEP 4. Let it sit and dry
STEP 5. Rock those bracelets :)


Tuesday, September 4, 2012

Greetings!


This blog will consist of DIY (do it yourself) projects that will spark your creativity and inspire you to try them yourselves  at home.  I will try DIY projects myself and share my experience, tips and step-by-step instructions. As a student, I am on a budget crunch that leaves  little cash left over for fun purchases, and I know many people can relate. So I Hope to create something new out of things I already have and save up to 75% of the cash I would have spent buying a product at full price. I hope my experiences will inspire you to DIY and have fun!