Wednesday, October 24, 2012

Simple Fall Scarf

Hi everyone! As the season has slowly been changing, so has the weather. Its definitely getting colder and windier here in Southern California. I think that this is the best time to introduce my do it yourself fall scarf! What I'm talking about is not creating a big, long and knitted scarf that hangs heavily around your neck, but it's going to be shorter, lighter and cuter :) Its basically going to dress up the top you're wearing and your friends will love it!

So I have been inspired by these quick and easy DIY scarves that I see on pinterest. I always repin my favorite ones and havent yet made one myself. Today will be that day! This project is going to be very quick and easy and your going to make one too! 

Although its colder out now, the weather is always changing here in Southern California. That means we don't always want a scarf that makes us too hott. I remember over the summer my mom bought a scarf that was similar to the one im going to make and it cost her $17. I think that it was too expensive for a scarf of that size and lacked detail.

With this project, you will not only create a cute accessory to your outfit, but your friends will admire your new scarf and you are going to save $$$ which is always a good thing!

The Project: Find a T-shirt that you don't mind cutting up and a pair of hefty scissors! That is all your need. Your scarf will be ready in no time!

DIY: 
STEP 1: Lay down on a flat surface
STEP 2: Cut off the part that separate
 STEP 3: Cut straight strands until the middle 
STEP 4: Make sure to turn it over and repeat STEP 3
 STEP 5: After making sure everything looks right, try it on and ROCK YOUR NEW SCARF!


Wednesday, October 17, 2012

Inspired nails with friends

Hi everyone, I want to introduce another nail polish project to you all because I just love doing my nails! I consider it a mini hobby or just something I enjoy doing overall. Well, every time I go into Walgreens I see the dollar bin of polish and think "wow these colors are so amazing and vibrant, don't mind if I grab a few!."

I like the brand Sinful Colors because they have almost every shade in vibrant and attracting colors that I can't NOT buy. Because also they are the most inexpensive brand you can find on the market.

So one of my close friends is also a nail polish freak like me and asked if I could do one of my projects on her fingers and of course it cheered me up because, how could I refuse? Not only did she provide the colors of her choice, but she was very pleased with the result and saved money $$. A color change at the salon with design is around $20 including tip; if that.

If you are going to try this at home, its a bit of a process but you will find that its a speedy process once you get the hang of it!

The Project: Choose two polishes and get a sponge to dab the colors with (or one of those white make up sponges that come in a bag), some top coat and also nail polish remover.

DIY:
STEP 1: pour one drop of nail polish the size of a dime, of each color on top of each other on a sheet of paper (or paint it onto the sponge)
STEP 2: Dab the sponge lightly into the colors you chose
STEP 3: After dabbing the colors, press the sponge gently on each nail(s)
STEP 4: Take a Q-tip and dip it in the nail polish remover and carefully remove the excess polish along the sides
STEP 5: After removing all the excess polish, apply top coat, wait to dry and ROCK YOUR COOL NAILS!


https://mail-attachment.googleusercontent.com/attachment/u/0/?ui=2&ik=ff1e8564b4&view=att&th=13a726115fa5d3df&attid=0.1&disp=inline&realattid=1416142458512192297-1&safe=1&zw&saduie=AG9B_P-Y_5MlLLJWd8Pqmg8CG0Q1&sadet=1350541253743&sads=Mej_z25o6mL6IAj0lWT57IjQBwY

https://mail-attachment.googleusercontent.com/attachment/u/0/?ui=2&ik=ff1e8564b4&view=att&th=13a726146c60cd13&attid=0.1&disp=inline&realattid=1416142472890522953-1&safe=1&zw&saduie=AG9B_P-Y_5MlLLJWd8Pqmg8CG0Q1&sadet=1350541363879&sads=KRoxvgfWUoSPr8kHCVcEAYXPBBY

https://mail-attachment.googleusercontent.com/attachment/u/0/?ui=2&ik=ff1e8564b4&view=att&th=13a726170aca5730&attid=0.1&disp=inline&realattid=1416142481798587072-1&safe=1&zw&saduie=AG9B_P-Y_5MlLLJWd8Pqmg8CG0Q1&sadet=1350541391668&sads=zLT02H9gf9Ydk3L3IOOoYqYcwYc
 https://mail-attachment.googleusercontent.com/attachment/u/0/?ui=2&ik=ff1e8564b4&view=att&th=13a7262508f0d643&attid=0.1&disp=inline&realattid=1416142496556593565-1&safe=1&zw&saduie=AG9B_P-Y_5MlLLJWd8Pqmg8CG0Q1&sadet=1350541426168&sads=wvV8clwK4-kcWXMlu1IYVbv1_uE


Wednesday, October 10, 2012

My podcast

                        Hi Everyone, I have created a podcast for you all. I hope you enjoy it :)

Wednesday, October 3, 2012

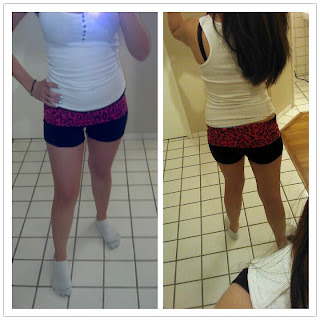
BORING SWEAT PANTS TO NEW GYM SHORTS

Hi everyone! I hope most of you are getting a hang of these projects, they are made to be quick, simple and fun. Yesterday I had a doctors appointment and was told that I need to incorporate exercise in my daily routine. Its been a while since I've stepped foot in the gym (about 7 months -__-).

SO, I've been thinking about going back soon. The only thing is that I need new gym clothes. Because going back to the gym is like going back to school or work, you need to look fresh! But I don't have extra money to spend on new shorts... It would probably cost around $12-$20 depending on where I shop. Not wanting to run to the store, my initial reaction was to run into my room and raid my dresser.

I have a drawer full of sweat pants that I barely wear and don't even care about much anymore. I chose a pair that I did not mind cutting up. Its time for you to find an old pair of sweat pants that you want as a new pair of sweat shorts!! In a few easy steps you will have a new pair of gym shorts without spending a dime!

The project: Turning forgotten sweat pants into fun new gym shorts. All you will need is a fine pair of scissors!

DIY:
STEP 1: Lay sweat pants down on a flat surface
STEP 2: Take a pair of shorts you already have and lay it over pants to get a precise measurement
STEP 3: Cut through the desired area that is appropriate for you
STEP 4: Try it on to see if front, back and sides look even
STEP 5: When happy with result, ROCK YOUR NEW WORK OUT SHORTS!!!