Wednesday, December 5, 2012

Best smartphone volume booster

Crummy sounding iPod docks can cost a great amount of money, and good sounding docks can cost a Bundle. Why waste your money when you can boost your volume just fine with a paper cup or a cereal box? I came across a tip on pinterest and found that some of them worked remarkably well—specifically, sticking your phone in a paper cup. I came up with this idea one day when I was charging my phone and suddenly my music turn on, and the sound came out really loud and clear, it was like having speakers. It reminded me of the lotion bottle phone holder .

This isn't exactly the most scientific test in the world, just a simple experiment. However, the paper cup was not just the loudest, but also the best sounding. There are several other methods to boost the volume of your smartphone but this one really works for me. There are quite a few tricks to try and the best methods work when you least expect it to. Just use something you can put your phone in that boosts sound.

I think that this method is like temporary smartphone speakers. I like to use it when I'm in the shower,  in my room getting ready or cleaning around the house. Its a great way to keep me going, and I'm so glad that I don't have to purchase an expensive pair of speakers just for my phone.

You can use a glass cup or a phone cup. Just try to experiment and find out which method(s) work for you.

Tuesday, December 4, 2012

DIY scarf organizer

Hey everyone! Its that time of year again, scarf season! That said, it's crucial to take out all scarves out from hiding and display them nicely where they can be easily seen. Now, we can easily go to the store and spend a bunch of money on closet organizers but that would just be a waste when most of us have what we need in our own home.

Its easy to take the easy way out and buy the organizer but the easy way out some times are costly, and we don't want that, we want to save! So I came up with the idea to simply use a hanger. It sounds silly that scarves will be organized by just a hanger but my way works....atleast for me it does.

It can work for you too, its very easy!

Before I started hanging my scarves, they would be stashed away in my drawers where I couldn't see them nicely and most times I wouldn't even wear them because I couldn't see it clearly. With my own scarf organizer, its easy to see and takes up much less space and that's what we all need, more space!!

Now this is a basic DIY project because my left hand is still not in good shape to do really exciting, crafty projects. Thank you for your patience guys!

The project: Gather up scarves and all your hangers.

DIY:
STEP 1: Lay down scarves next to each other on a flat surface.
STEP 2: Choose 3-4 scarves to hang.
STEP 3: Hang scarf on to hanger and make a loop to make a knot then pull down.
STEP 4: Continue STEP 3 with each scarf.
STEP 5: Once your done, hang it in your closet and see how much new space you have!

I love mine!


Monday, December 3, 2012

Blog Break...

Hey everyone! So sorry for not posting new DIY projects lately. A week ago (night before thanksgiving) I had a bad accident where a part of my left hand got burned and I couldnt use my left hand at all. It is a second degree burn and for 5 days I couldn't even move my hand. That is why I haven't been able to create cool new projects to share with you guys.

These past few days I've been able to move my fingers and stretch my hand a bit by where the burn is, which is good because that means its healing. I will have a new DIY post up soon! Its not going to be anything too crafty because I'm barely able to do anything involving both hands, since I don't want to get infected so I have to be careful. Thank you for your understanding!


Wednesday, November 28, 2012

2nd audio podcast

Hey guys, I have created a second audio podcast for you to keep up with my latest most popular trends. I kind of touched up on one project that has been a hit, its been so popular and recognized in public especially. People have definitely been impressed. So check it out and hope its to your liking. Like I said before, may you all find inspiration in this post and hope it motivates everyone to start DIYing. Thanks!

Wednesday, November 14, 2012

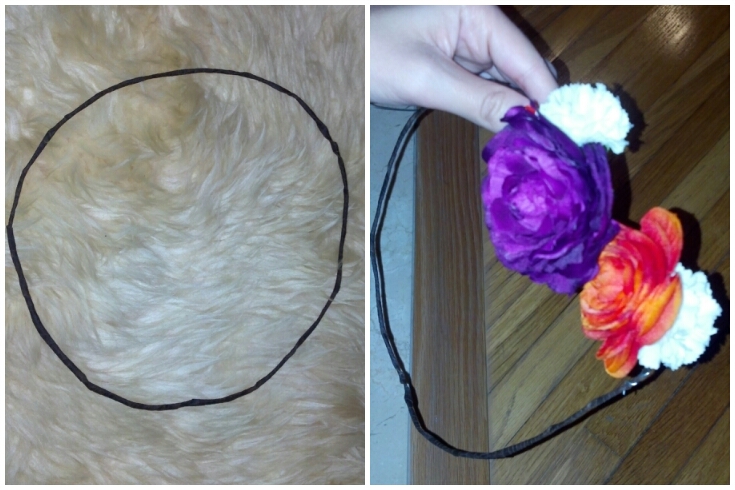
DIY Floral headpieces

Hey everyone, Just wanted to share another weekly inspiration to you all. This weeks inspiration comes from a friend of mine. She introduced my to the Lana Del Rey headpiece. You can go on Pinterest and search Lana Del Rey she is a model and has been fashioning these beautiful, floral head pieces.

So I decided to check it out myself and fell in love. A couple of my girlfriends and I got together the other night and raided the garage for the old glue gun and any fake flowers we could find. Gathering the material was a success because I wasn't about to spend over $40 bucks on everything. Everything adds up and turns out to be very costly. Its scary how that happens.

After gathering up all of the material, figure out a pattern for your flowers, an order in which its going to sit on the crown. This was my first time making this headpiece  and when if you decide to do this project also, remember that we are not experts and its ok if it doesn't look like the one online. Atleast it was worth the try right?

Project: Gather your materials, wire, felt, fake flowers, and a glue gun....masking tape is optional.

DIY:
STEP 1: Take the wiring and measure your head with it.
STEP 2: After measuring, cut off the wire where it ends on your head.
STEP 3: Use dark colored masking tape to coat the wiring so the wire doesn't show.
STEP 4: Glue flowers one by one, next to eachother along the wiring.
STEP 5: Cut thing strips of felt and glue it in the inside lining of the crown (this is so that it sits comfortably on your head and doesn't poke you).

When finished and happy with result, ROCK YOUR NEW FLORAL LANA DEL REY HEADPIECE!


Thursday, November 8, 2012

Putting down the hot tools

Today I want to share my inspiration with you all. I just discovered a quick and easy way to style and tame my natural, curly hair! Most of the time I straighten my hair which leaves my hair dry and ends dead. Well, I wasn't surprised to learn that straightening my hair a lot is the reason why my hair doesn't grow longer.

I want longer and healthier hair, so putting down the hair straightener is what I'm going to do. Anyways, I found a cool new way to style my hair. After trying it out I began loving the way my curly hair was staying; very natural and tamed, and not too poofy.

So I came across a Pinterest post that demonstrated a "how-to" on natural curls and simple steps and natural, beautiful curls are achieved....without spending hours using the curling iron to get a similar result.

The Project: With leave in conditioner, gel spray and a t-shirt, tamed-natural curls will be acheived.


DIY:

STEP 1: brush hair when damp, then apply the leave in conditioner only an inch below the root of the hair all the way to the end.
STEP 2: apply the spray gell all around, make that once again it doesnt reach the root of hair.
STEP 3: Scrunch hair with a T-shirt, not a towel.
STEP 4: Pin back any part of your hair that you would like, like a side pin.
STEP 5: After scrunching, it is up to you to apply more spray gel. When happy with result, ROCK THOSE CURLS

You just saved time from spending on using a curling iron, with a few simple steps it was easy to achieve beautiful and natural curls.

TIP: I would also like to add that I did not have leave in conditioner so I used regular conditioner that still worked perfectly fine on me :) Hope you will find that this works for you too.


Thursday, November 1, 2012

Video blog

Hello everyone, Today I am posting a video that I have created where I actually demonstrate one of my favorite DIY projects. I really wanted everyone to see the process of how I create my pennyless projects. There are several DIY projects that I have posted about with pictures but this is a video version that will actually teach you all how I do it.

I hope that this video will be just as educational and inspirational to those that are also passionate about DIY projects. May you all find it simple and easy, and do-able to fit into your busy lifestyle. There is not enough time in the day but sometimes we surprise ourselves when we actually try something.


I am no expert at DIY projects, I'm a beginner. Just want everyone to remember to have fun along the way and know its ok to mess up :)